Test the local web wallet
Overview#
The local web wallet is the web version of the Diem Reference Wallet.
The local web wallet is a web wallet interface provided as a demonstration of a centralized (custodial) service for consumers. It is meant to be run on a local machine. The wallet demonstrates the following use cases:
- Sending Diem Coins to another Diem wallet address.
- Receiving Diem Coins from another Diem wallet address.
- Exchanging fiat money for Diem Coins and vice versa.
- Converting between the different Diem Coins.
- Viewing transaction history.
- Basic risk management and AML compliance flows.
The main purpose is to demonstrate common use cases when working with Diem Coins and show options for further development. To illustrate key Diem wallet concepts, we’ve simplified the implementation and avoided some of the complexities of real world, production-grade financial software.
This code is to be used as a reference only. Never use this code in production!
Solutions stack#
The Reference Wallet web UI has been developed using the following tools:
| Programming languages | TypeScript, HTML, Sass |
| Package manager | Yarn |
| UI framework | React |
| Components and layout framework | Bootstrap |
| Testing framework | Jest |
| HTTP client | Axios |
Assumptions#
The Reference Wallet implementation makes several assumptions to simplify the system.
Simplified authentication model#
The Reference Wallet uses simplified authentication and authorization mechanisms. Users are authenticated using a username and password. When a user logs in successfully, a bearer token is issued for the user by the backend server and stored in the tokens table.
The software client is expected to pass the allocated token in the header of each request, as per the Bearer token authorization specification (RFC 6750). Any request presenting the token is fully authorized to access associated resources, without demonstrating any right for the token possession. In addition, it is the client’s responsibility to refresh the token frequently enough, before the token expires (usually refreshed upon page transitions, posting data, and so on).
Simulated user account verification#
The Reference Wallet simulates the account verification process by returning the verification URL to the client directly upon the completion of the sign-up phase. The client automatically navigates to the address. At this point, you may choose to send an email to the user allowing them to click on and verify the message.
User flows#
The image below details the different user flows for the local Reference Wallet web client.

Development#
You can read further technical documentation in the Reference Wallet git repository. All web UI resources can be found here.
Deploy the Reference Wallet#
To deploy the Reference Wallet, please refer to the latest information in the Backend README here.
Test login and authentication#
Register and sign up#
New users who want to use the reference wallet local client need to register with the service. The registration process:
- Protects the user’s personal information.
- Assessment of the risks involved in maintaining a business relationship with the user.
- Compliance with KYC guidelines and AML regulations as required by law.
During registration, the local user is asked to provide information required for proper identity verification and account security. The registration process collects this information in multiple steps:
- Login credentials, including a strong and unique password.
- Personal details, including name, date of birth, and phone number.
- Country of residence.
- Address.
- Photograph of an officially recognized identification document (e.g., a passport or driver’s license, as defined by the local jurisdiction).
- The base currency used for presentation of the conversion rates.
The account verification begins once the user completes registration. The user won’t be able to access the wallet until their account is verified.
Account verification demos the expected behavior of a hypothetical wallet. For the Reference Wallet local client, the verification succeeds automatically and the “pending” state is presented briefly to the user for demo purposes only.
In addition, the identification document is always accepted and is not analyzed or stored by the backend. Real-world user verification and risk management are beyond the scope of the reference wallet and contain many opportunities for further development.
Read more about the user verification in the Risk section.
Sign in#
The local web client is accessible only for authenticated users. When a user accesses the wallet website, the login page is the first page presented to the user. This is where the user is authenticated using their email id and password.
Upon login, if a user is presented with a “Verification Pending” page, it means that the authentication has been successful but the user verification process is still underway.
The password can be reset using the “Forgot Password” link. Alternatively, if the user is not yet registered, they can proceed to register by activating the “Sign up” link on the page.
Sign out#
A user can sign out of the wallet on the Settings page.
Reset password#
It is possible to reset the user password by entering a verified email address on the password reset page. The page is accessible by following the “Forgot Password” link on the login page. Note that the email address provided must be an address previously registered in the system.
Note: For the reference wallet, entering a known email address redirects the user immediately to the password change page, without sending the reset message.
View home page#
The home page is where most user actions are performed, and an overview of the wallet balances can be seen. The balances are displayed separately for each Diem Coin currency and as an approximation of the total amount.
User actions available on the home page include:
- View full transaction history for a Diem Coin currency; this can be activated by clicking an item in the balances list.
- Send Diem Coins.
- Receive Diem Coins.
- Add Diem Coins to the wallet; activated by clicking “Transfer” and then “Add.”
- Withdraw Diem Coins from the wallet; activated by clicking “Transfer” and then “Withdraw.”
- Convert between Diem Coin currencies.

Modify settings#
On the Settings page, a user can sign out from the wallet, edit general preferences, and add payment methods.
The modifiable preferences are:
- Local currency—affects the base currency used in the currency exchange operations throughout the wallet.
- User interface language.
The supported payment methods are:
- Credit cards
- Bank accounts
In addition, the page shows the email address of the active user. It is not possible to change the user’s email address.

The payment methods are for demonstration purposes only. The supplied information is not validated, and no real transactions are made using the configured credit cards and bank accounts.
To change the wallet UI language, enter the Settings page and choose the desired language from the languages dropdown menu:

Execute transactions#
View transactions list#
Choosing a specific Diem Coin currency on the home page shows all the wallet transactions for that currency in descending order. Transactions may be internal (i.e., off-chain), within the wallet’s network (e.g., Diem deposit from a credit card), or external (i.e., on-chain) on the Diem Blockchain (e.g., Diem transfer to some external Diem address).
Each transaction consists of:
- Direction (sent or received)
- Address
- Amount of Diem Coins
- Current fiat value in default fiat currency, as configured in the wallet settings
- Transaction execution date
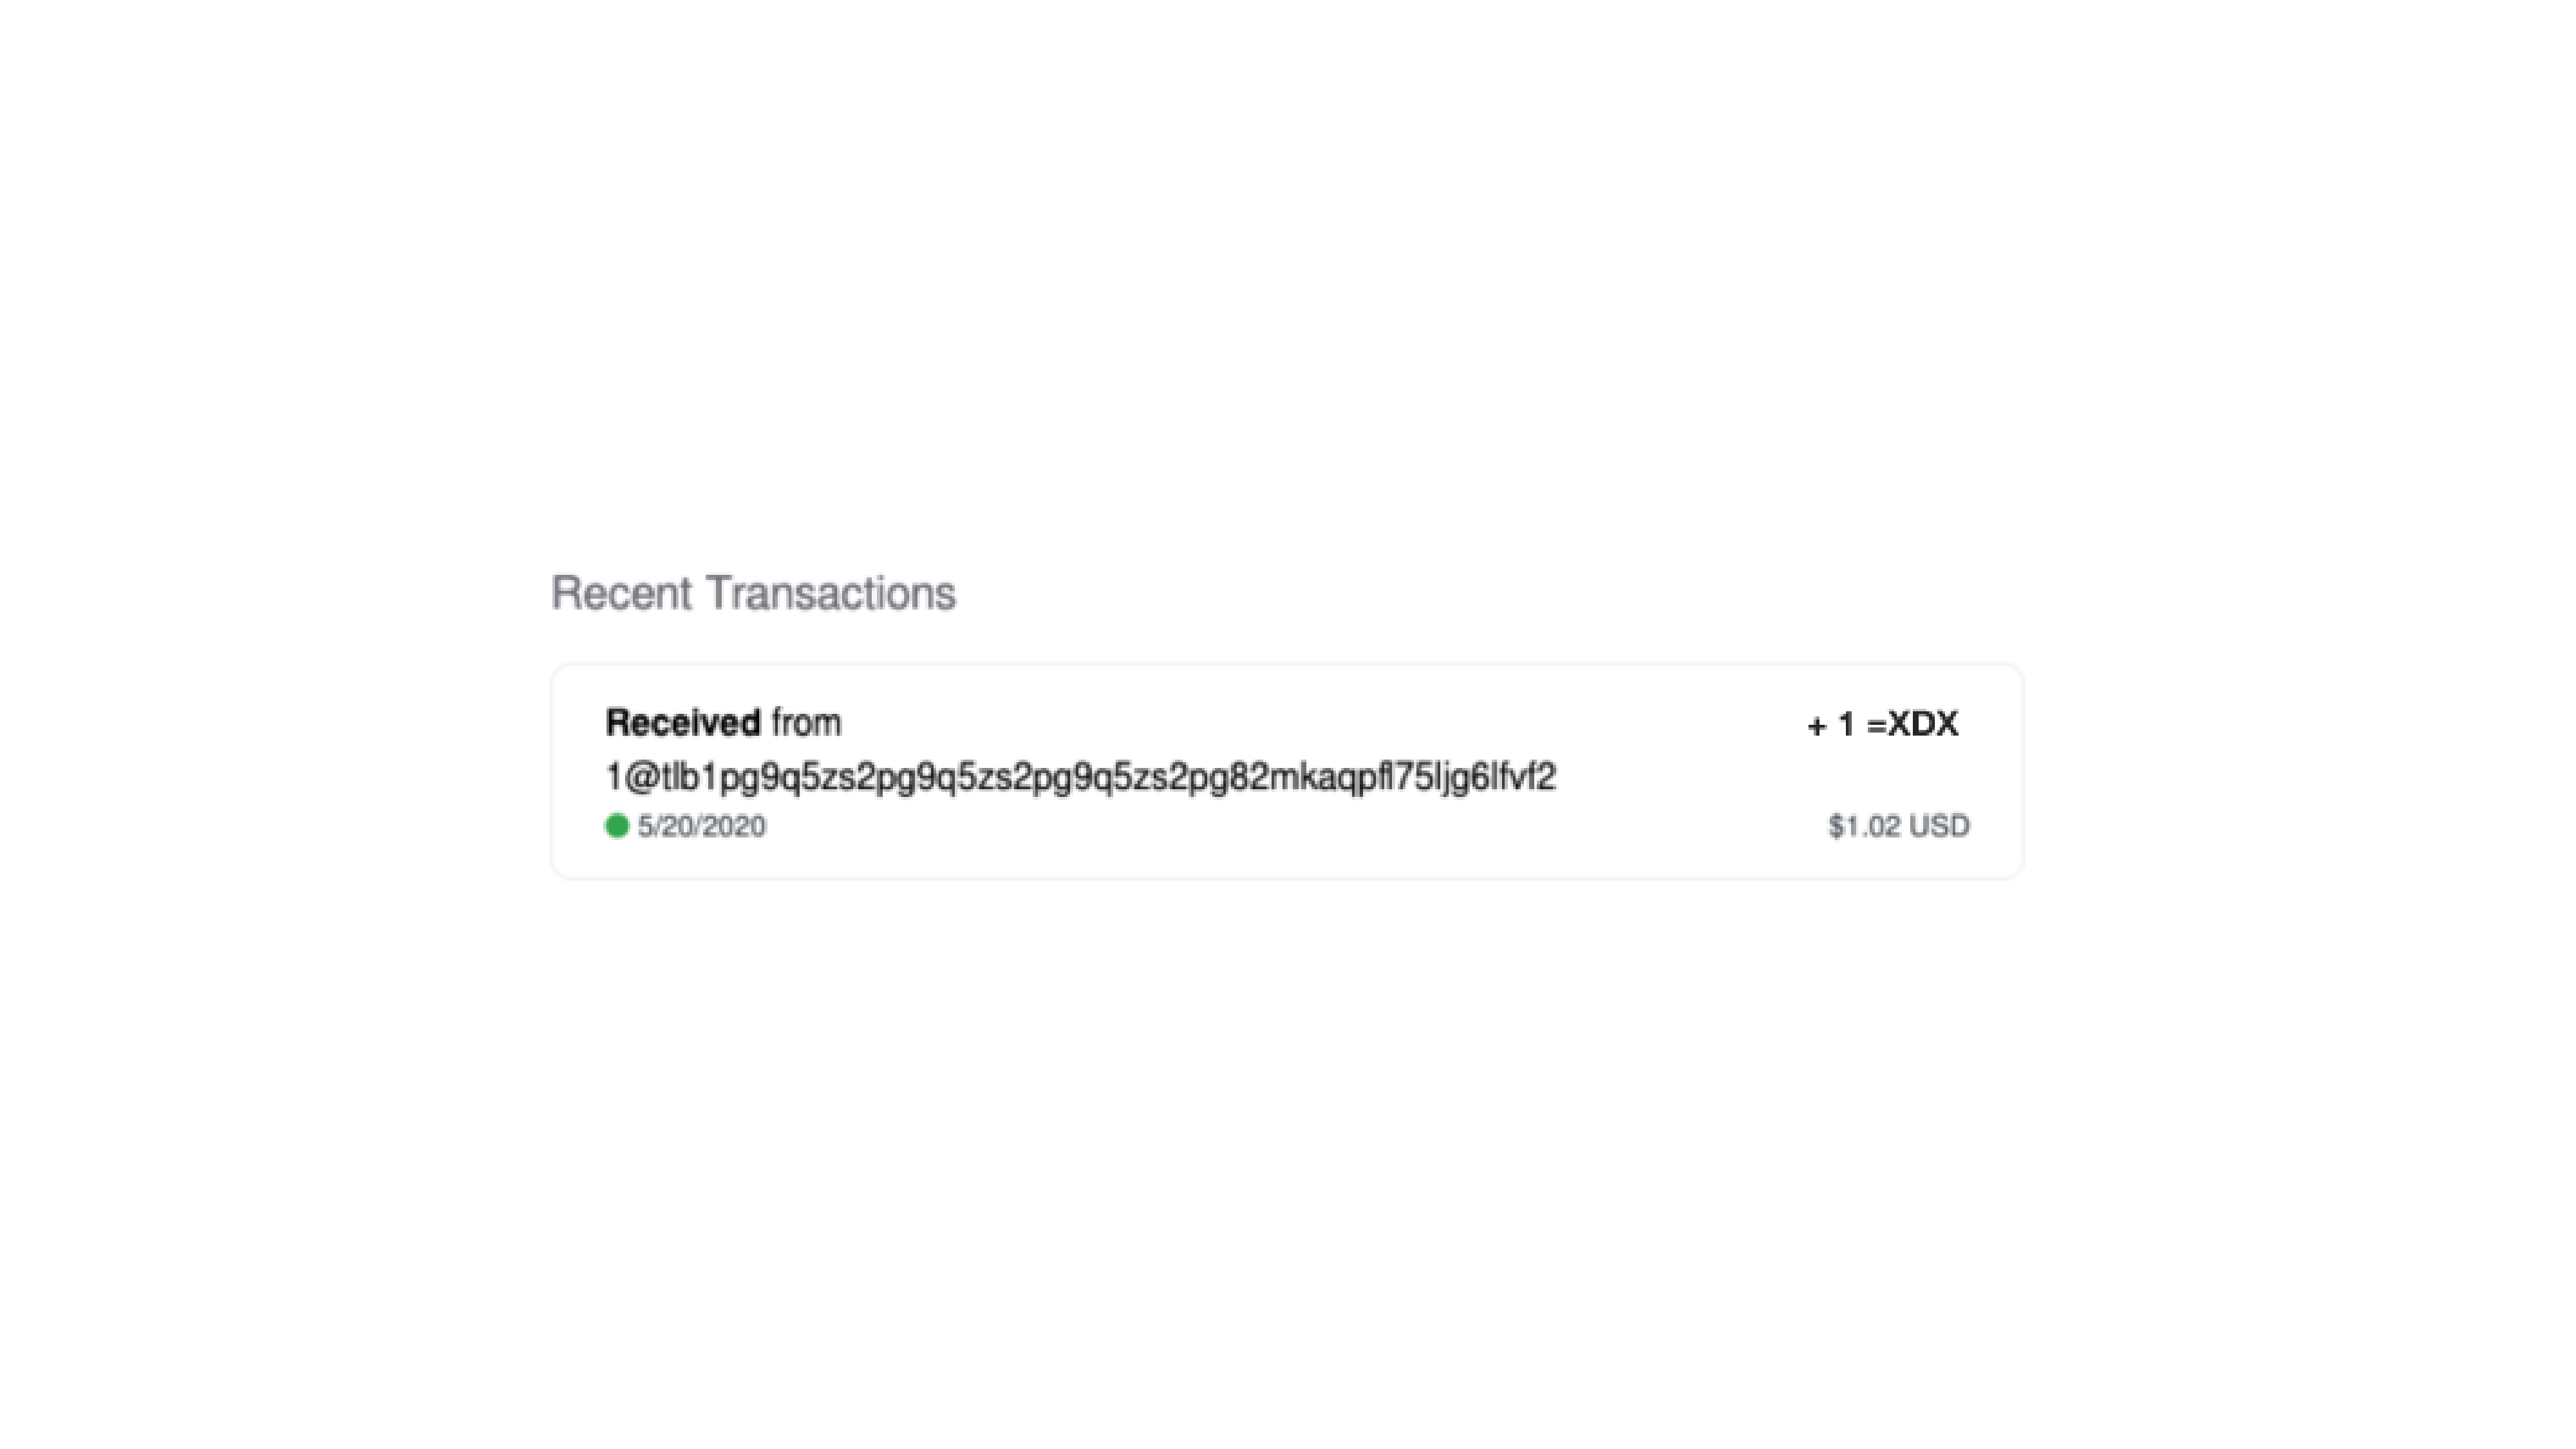
Check transaction details#
Clicking a transaction in the transactions list will open a window with transaction details.
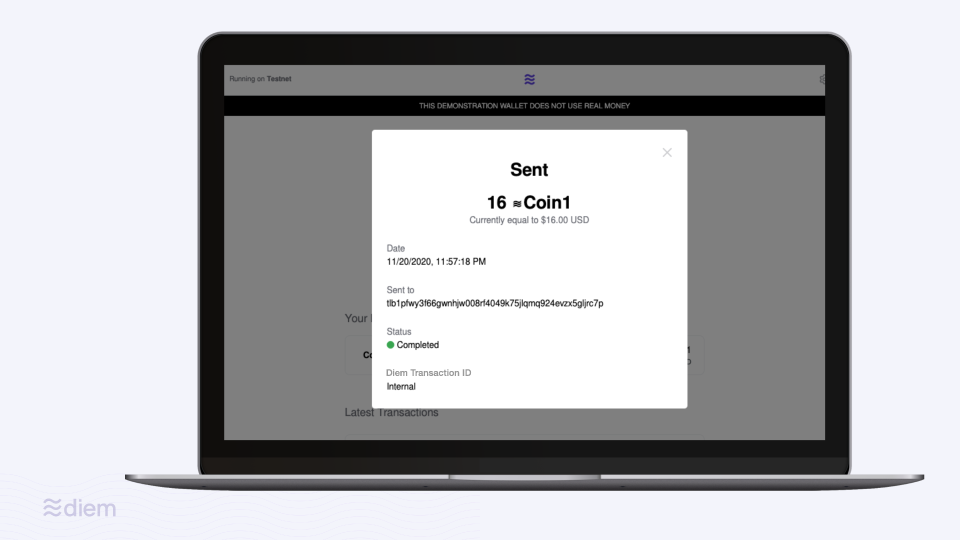
Each transaction consists of:
- Direction (sent or received)
- Amount of Diem Coins
- Current fiat value in default fiat currency, as configured in the wallet settings
- Transaction execution date and time
- Address
- Diem transaction ID – Diem transaction ID – Diem Blockchain ledger version number of the transaction with link to an external Diem Blockchain explorer, if applicable. If not applicable, as in the cases of internal transactions, the field will be marked as unavailable.
Deposit and withdraw Diem Coins#
Users can deposit and withdraw Diem Coins to and from the Reference Wallet.
When a user requests to deposit an amount of Diem Coin, the Reference Wallet simulates a purchase of Diem Coins using the user's credit card or bank account wire transfer.
For your safety and security, never use real credit card or bank account details.
To perform a deposit, follow these steps:
- Make sure you have a payment method defined. Payment methods can be defined on the Settings page.
- On the home page click “Transfer.”
- Choose “Add.”
- The user will be presented with a deposit dialog. You should specify: a. The funding method, which is one of the configured credit cards or bank accounts. b. The Diem Coin currency to purchase. c. The amount to deposit. The deposit amount can be specified either in Diem Coins or in the fiat currency of choice; the wallet will calculate the correct price or the resulting Diem amount accordingly and reflect that in the dialog.
- Click “Review.” The view will change to a confirmation dialog summarizing the purchase details, including the exchange rate.
- Click “Confirm” to execute the purchase. Clicking on “Back” allows modification of the purchase details. Clicking on “X” in the top right corner cancels the operation.
- Upon execution, the added funds will be reflected in the balances summary on the home page and in the transactions list.
The Diem withdrawal process is performed by clicking “Transfer” and then “Withdraw.” The process behaves very similarly to the deposit process. Upon withdrawal execution, the specified amount is deducted from the user balances.
Convert between Diem currencies#
In a production application, this action will need to be supported by a regulated VASP.
To convert from one Diem Coin currency to another:
- On the home page click 'Transfer'.
- Choose 'Convert.''
- The conversion dialog will be presented. You should specify: a. The source Diem Coin currency.. b. The target Diem Coin currency.. c. The amount, either in terms of the source or the target currency; the converted amount is calculated and reflected automatically to the user.
- Click “Review.” The view will change to a confirmation dialog summarizing the conversion details, including the exchange rate.
- Click “Confirm” to execute the conversion. Clicking on “Back” allows modification of the purchase details. Clicking on “X” in the top right corner cancels the operation.
- Upon execution, the changes will be reflected in the balances summary on the home page and in the transactions list.
Send Diem Coins#
To send Diem Coins to another address:
- On the home page click “Send.”
- The send dialog will be presented. You should specify: a. The specific Diem Coin currency. b. The Diem Blockchain destination address c. The amount, either in terms of the Diem Coin currency or in terms of a fiat currency of choice; the counterpart is calculated and reflected automatically to the user.
- Click “Review.” The view will change to a confirmation dialog summarizing the transaction details, including the exchange rate.
- Click “Confirm” to execute the transaction. Clicking on “Back” allows modification of the purchase details. Clicking on “X” in the top right corner cancels the operation.
- Upon execution, the changes will be reflected in the balances summary on the home page and in the transactions list.
Receive Diem Coins#
Other wallets can send funds without any action on the receiving party’s side, assuming they know the recipient’s address. To see the address of a wallet, click “Request” on the home page. A wallet has a different address for each Diem Coin currency. To get the correct address, the user should verify that the right currency is selected. The actual address is presented at the bottom of the dialog as clear text. It can be copied into the clipboard by clicking the available button, or scanned using the QR code.